

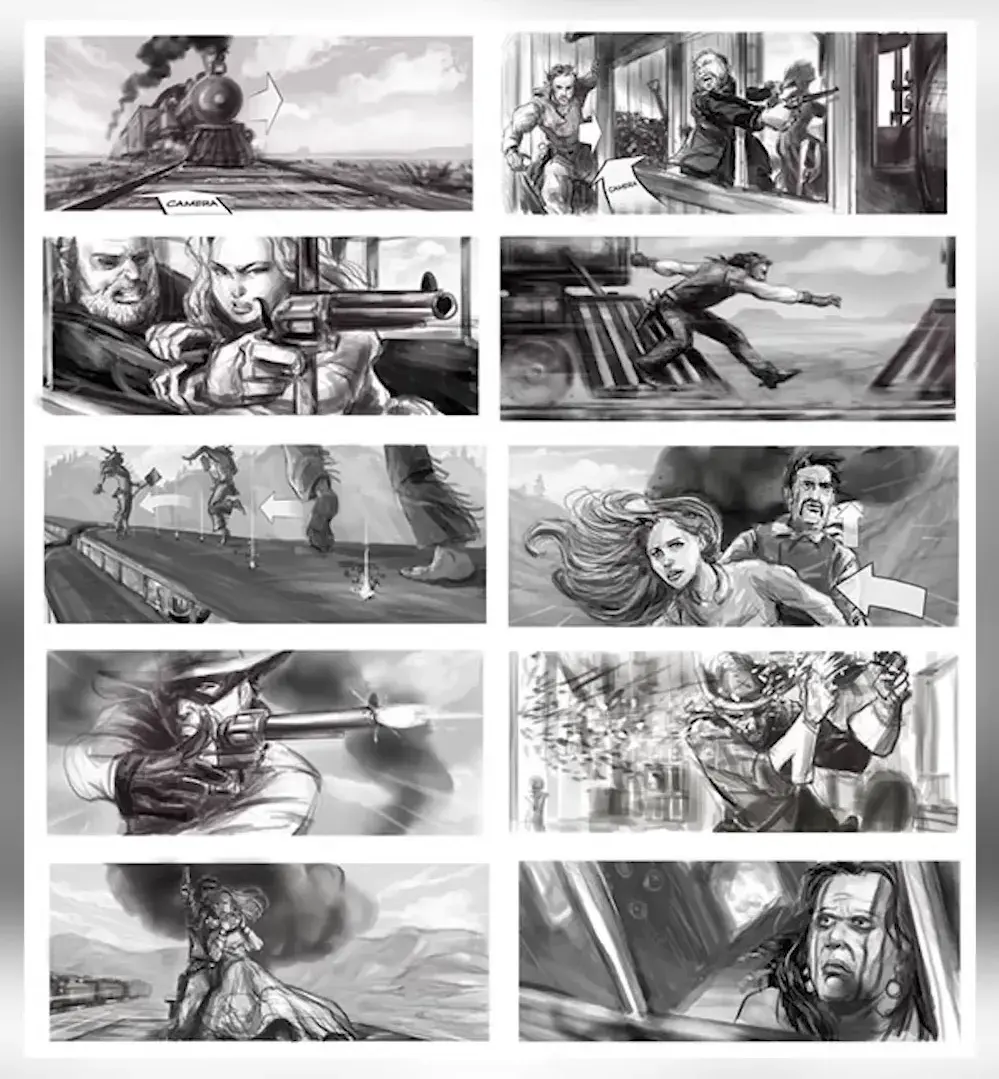
In the world of video production, B-roll is the unsung hero that elevates ordinary footage into compelling visual storytelling. While your primary footage i.e. A-roll, carries the main narrative, B-roll works behind the scenes, providing context, emotion, and professional polish that can make the difference between amateur content and professional-grade production.
From documentaries and news broadcasts to YouTube videos and corporate presentations, understanding how to effectively utilize B-roll has become an essential skill in modern content creation.
This guide will delve into the technical aspects, creative applications, and industry best practices that make B-roll an indispensable tool in any filmmaker's arsenal.
Understanding the B-roll
In technical terms, B-roll is supplementary or secondary footage that is intercut with the main footage (A-roll) to enrich the story's visual narrative and provide additional context.
It typically includes establishing shots, cutaway footage, and alternative angles that complement the primary content while maintaining visual continuity and pacing.
You can relate it to news broadcasts when a reporter covers a story about local business growth; you will notice shots of storefronts, people shopping, or workers in action interspersed throughout the main narrative.
This B-roll footage provides visual evidence that supports the story while keeping viewers visually engaged with changing scenes and perspectives.
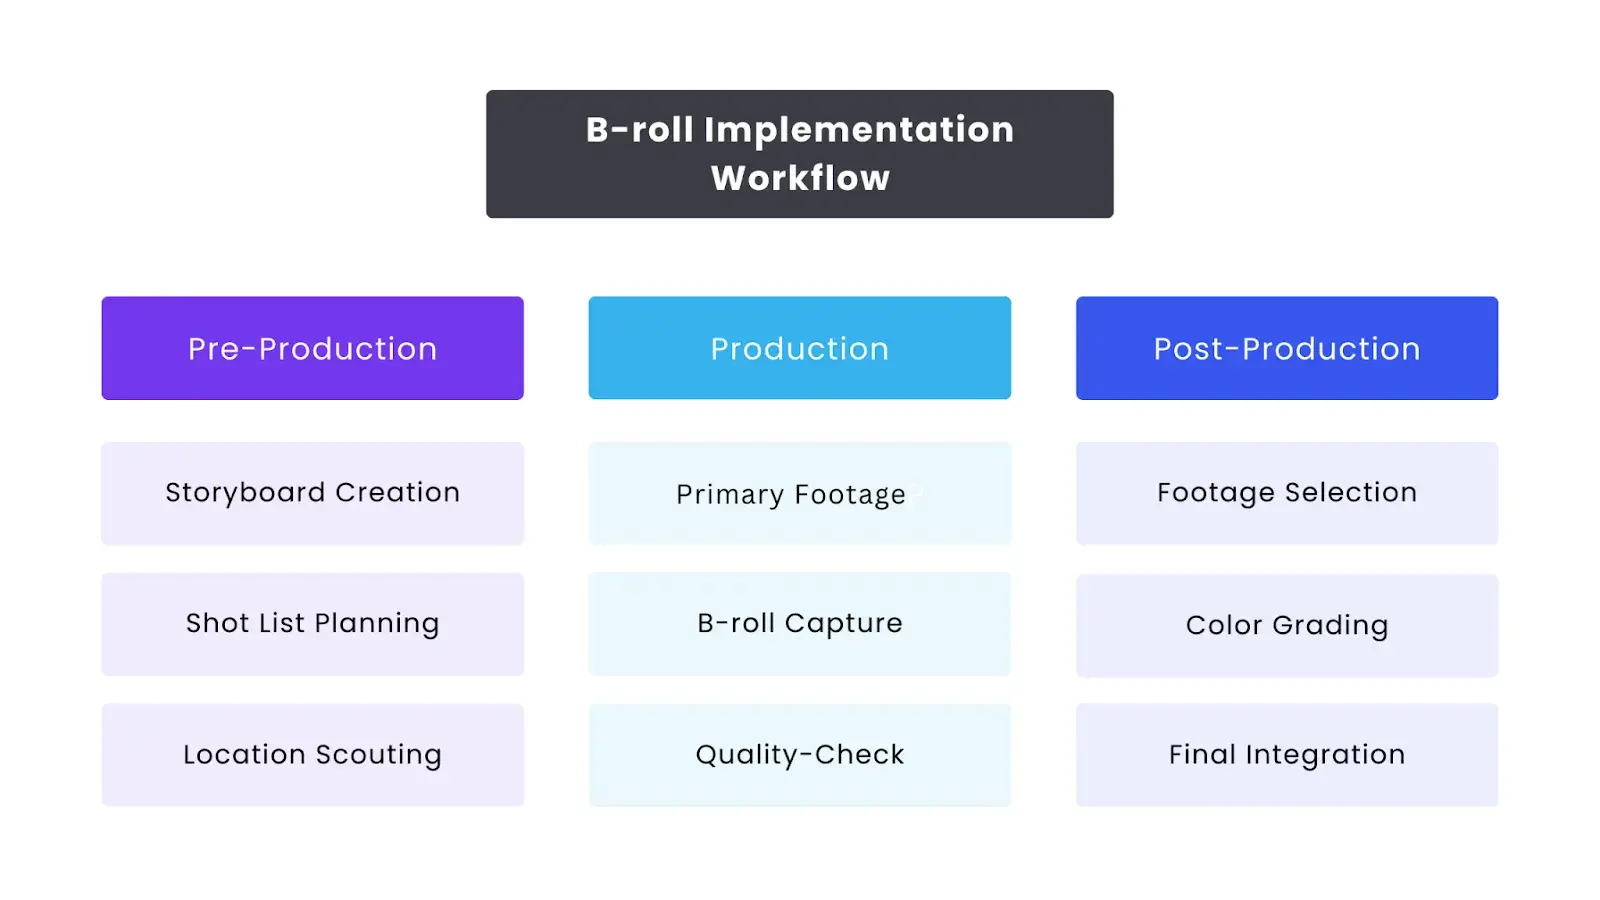
How to shoot B-roll: step-by-step documentation
Pre-production phase
1. Sketch out your explanatory B-roll scenes
Before you start collecting or filming B-roll, you should plan out exactly what supplementary footage you'll need rather than randomly shooting footage and hoping it works. Make a list of all the supplementary footage you'll need based on your content goals and your main (A-roll) footage.
This planning stage is crucial because it ensures you capture all necessary angles and shots while you're at the filming location. It prevents the need to schedule additional filming sessions later to get the footage you missed. Essentially, it emphasizes that preparation before shooting B-roll saves time and helps ensure comprehensive coverage.
2. Scout your location
Understanding the location thoroughly helps you determine what equipment you'll need to bring and what technical considerations you should prepare for. You should visit your filming location in advance rather than showing up on shooting day unprepared.
During this scouting visit, you should identify the best places to position your camera, check how the light works in the space (where it comes from and how it changes), and spot any potential problems that might affect your shoot.
The time invested in visiting and understanding your location beforehand will pay off in the quality of your final footage, ultimately leading to more polished and professional B-roll footage.
3. Understand camera movement techniques
Static shots
Static shots are fundamental elements of quality B-roll, despite seeming simple. These shots give viewers a visual rest from motion, providing stability in the viewing experience. They're particularly effective when you need to show intricate details of something or when you want to establish the mood or atmosphere of a location.
You can use a tripod to create steady footage that looks clean and professional. These stable, non-moving shots are excellent for establishing shots (which show viewers where a scene takes place) and for product close-ups where detail is important.
Slider movements
Slider movements add value to the production by creating smooth lateral camera movements that give footage a cinematic quality. This controlled, consistent motion changes ordinary scenes into compelling visual sequences.
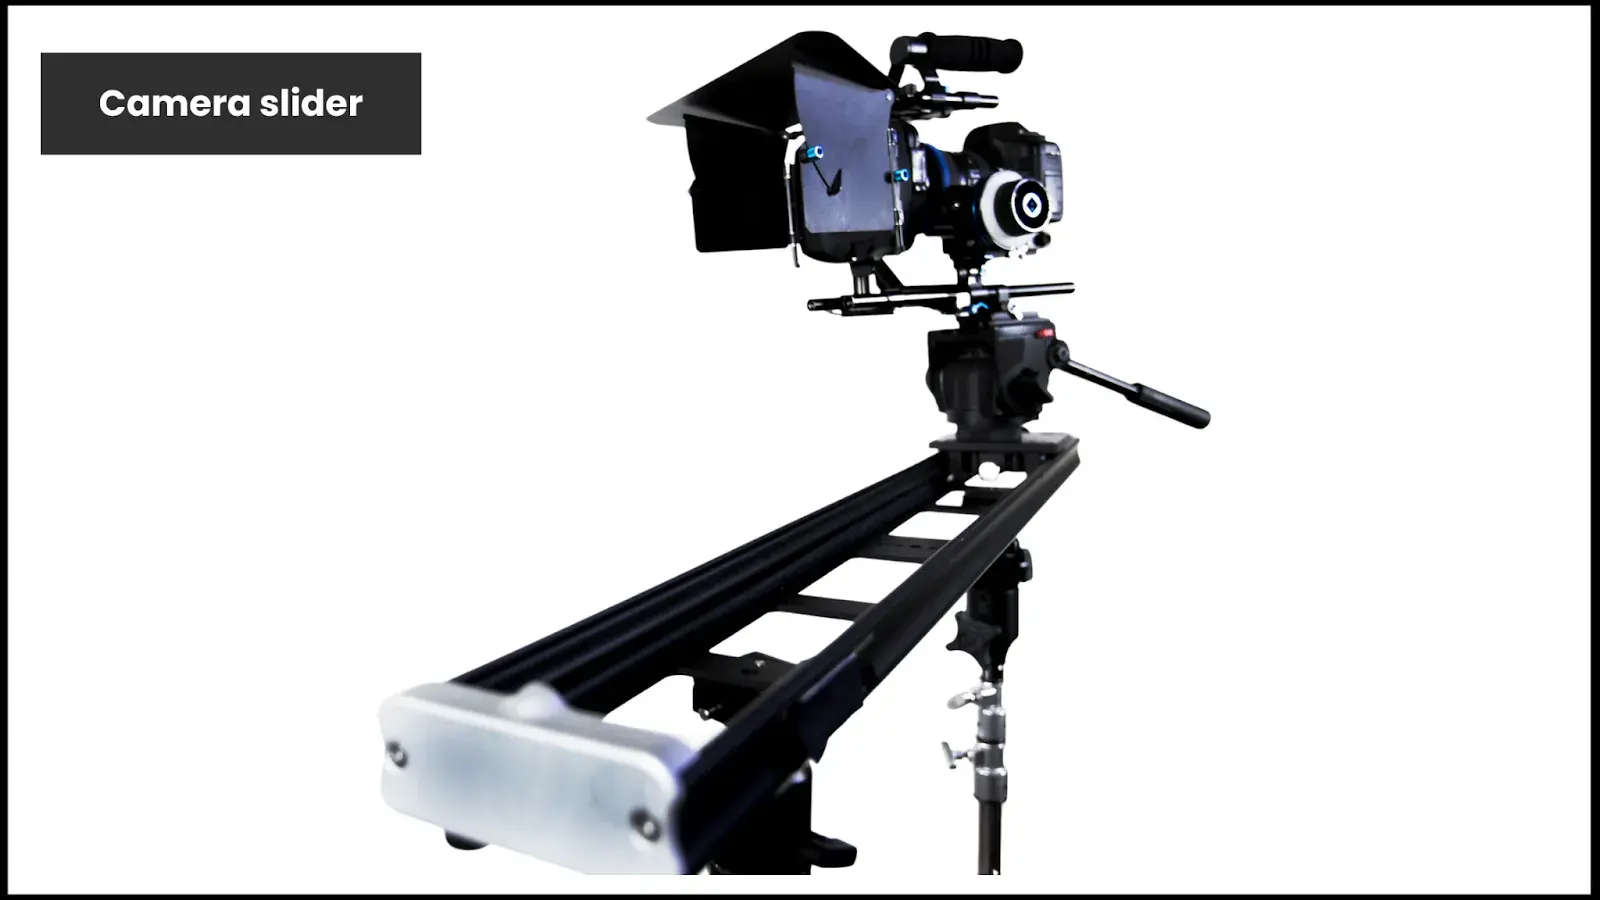
You can use a camera slider that allows the camera to move horizontally in a smooth, controlled way. These sliding shots are particularly effective for:
- Revealing shots (gradually showing something to the viewer)
- Product showcases (smoothly moving around an item)
- Transitional scenes (moving between different parts of your video)
Gimbal shots
Using a Gimbal creates fluid, stable motion in your footage, even when the camera is moving. It allows you to smoothly track subjects or capture immersive environmental shots without shakiness.
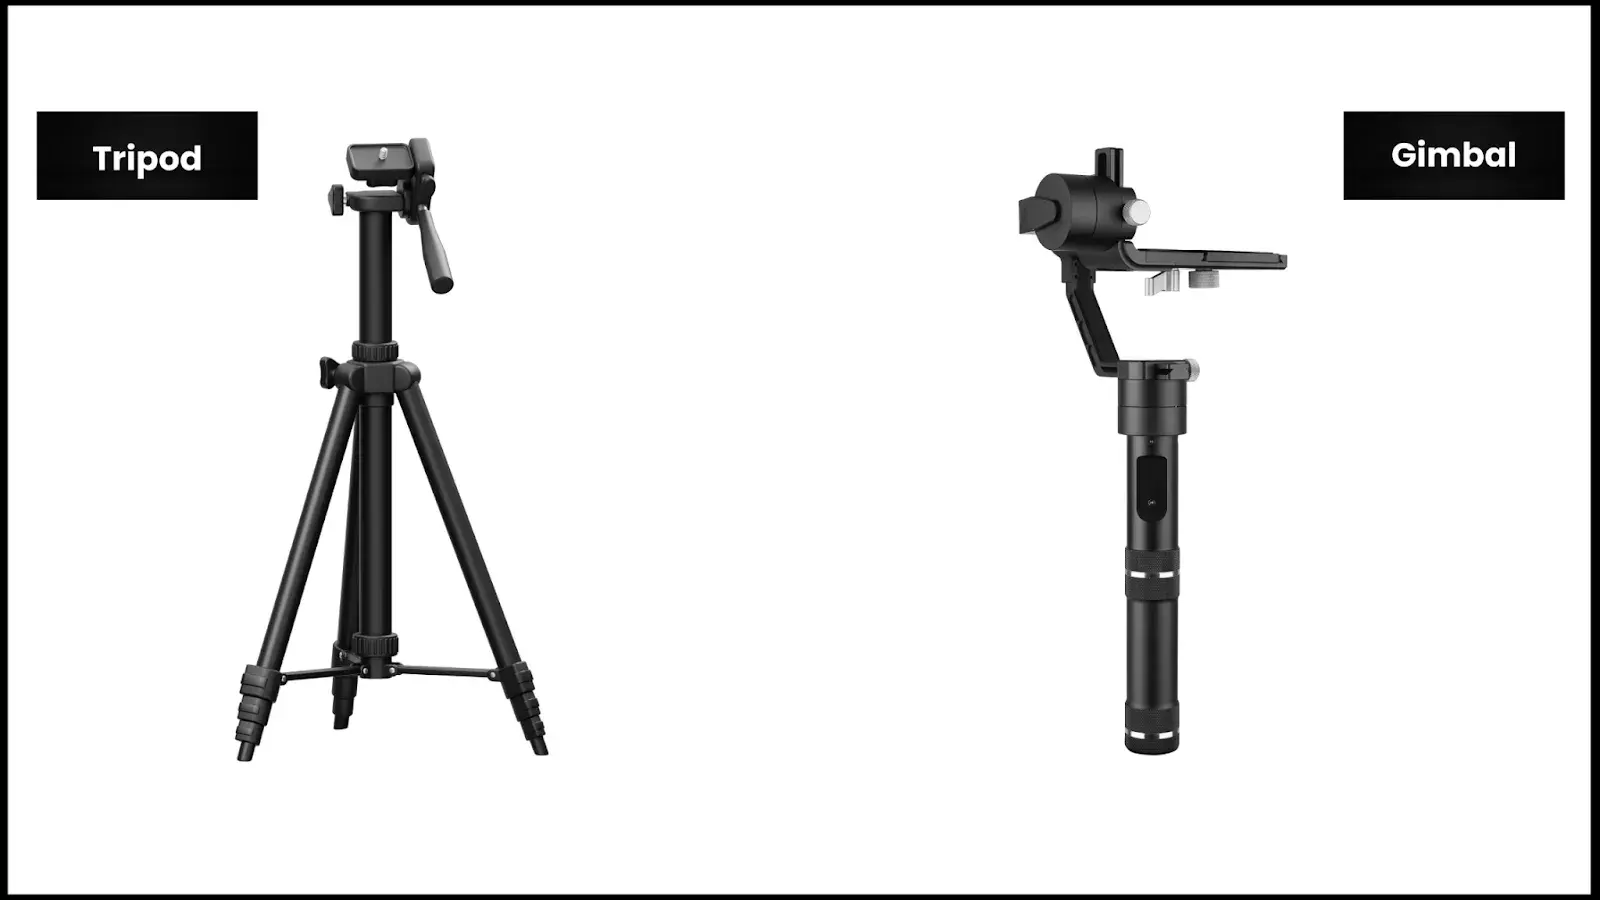
The technique is beneficial for creating reveal shots (gradually exposing what's being filmed) and for filming dynamic sequences that require camera movement. The key benefit is maintaining professional-looking, stable footage while having the freedom to move the camera around.
4. Know composition techniques
Rule of thirds
The Rule of Thirds is a fundamental composition guideline where you mentally divide your frame into a 3x3 grid (two horizontal lines and two vertical lines), creating nine equal sections.
The four intersection points of these lines are called "power points," naturally strong focal areas where viewers' eyes tend to gravitate. Understanding and applying the rule of thirds helps create visually balanced and engaging B-roll shots.

While shooting B-roll, position key elements along the grid lines or at their intersections to achieve naturally appealing compositions that draw viewers' attention exactly where you want them to be.
Leading lines
Leading lines are visual elements within your frame—they can be roads, fences, buildings, rivers, or any linear elements that naturally draw the viewer's eye toward your main subject or focal point.
When shooting B-roll, look for these linear elements and position your camera to use them effectively. When you incorporate these lines in your B-roll footage, they create depth (making flat images appear more three-dimensional) and add visual interest.
This technique is powerful because it works with the natural way our eyes follow lines within an image, making your B-roll more visually engaging and purposeful rather than just random footage.
Depth of Field
Depth of field simply means how much of your shot is in focus (sharp) versus how much is blurry. It's like controlling which parts of your video the viewer can see clearly.
This visual element is crucial in shooting B-roll as it helps create mood, direct viewer attention, and add professional polish to your footage. There are two primary types of depth of field: shallow and deep.
Shallow depth
A shallow depth of field creates a distinctive look where only a small portion of the frame remains sharp while the surrounding areas blur into a soft background. This effect is achieved by using wider apertures (lower f-numbers) on your lens, typically f/1.8 to f/2.8. In contrast.
This technique isolates your subject from its surroundings, drawing the viewer's eye directly to what's important.
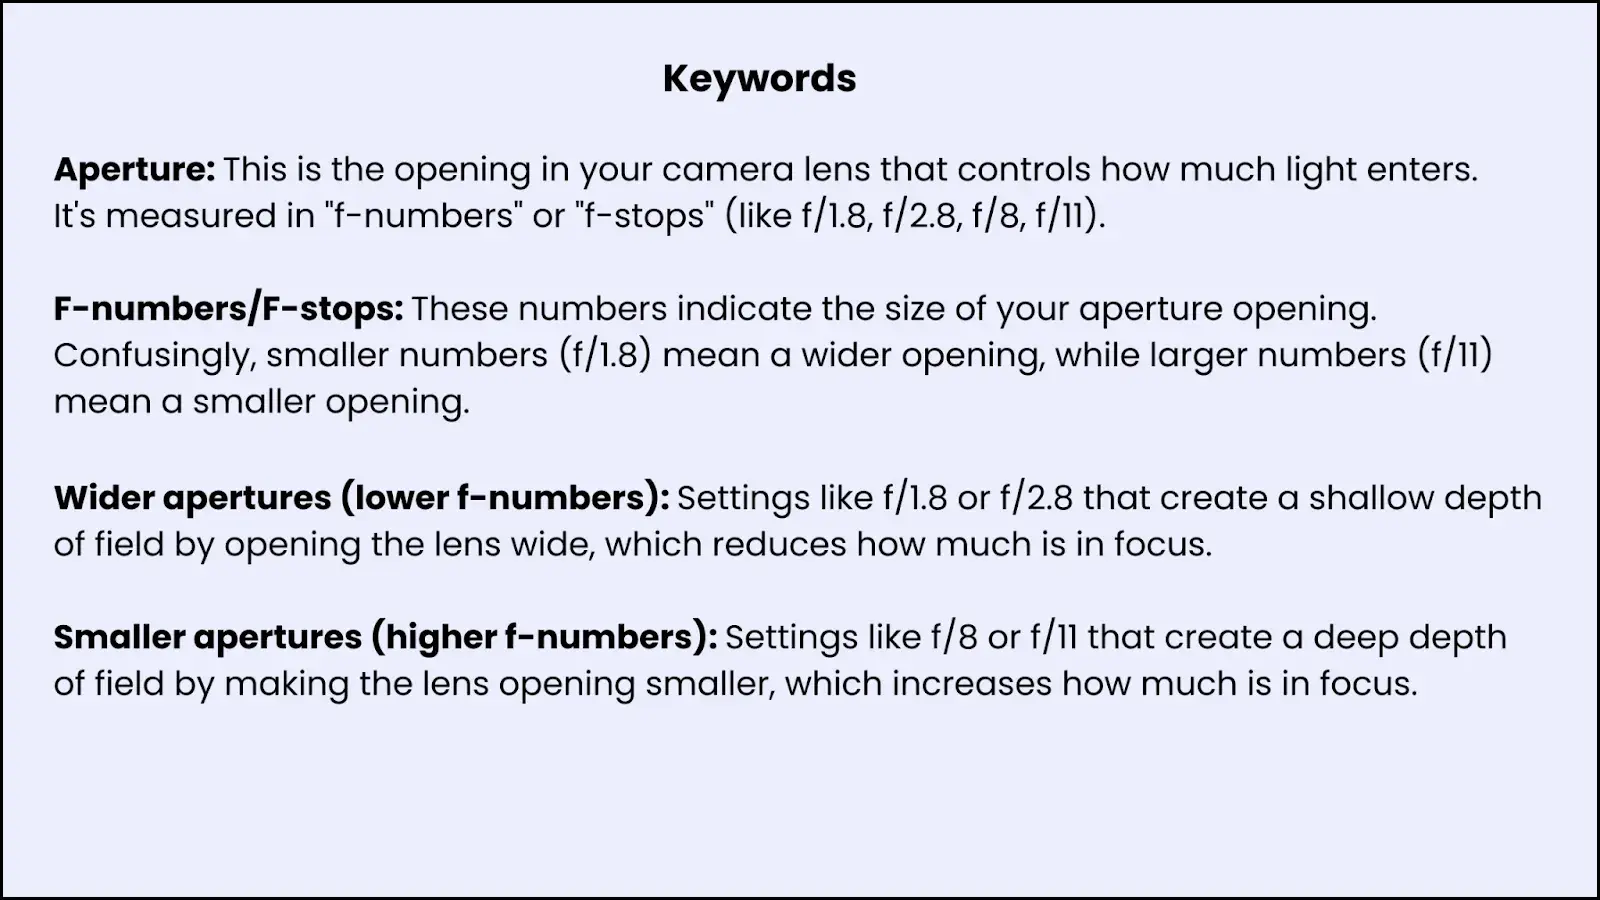
Deep depth
Deep depth of field maintains sharpness throughout most or all of the frame, keeping multiple elements in focus simultaneously. This is achieved using smaller apertures (higher f-numbers) like f/8 or f/11, ensuring clarity from foreground to background. This allows viewers to see and understand relationships between all elements in the scene.
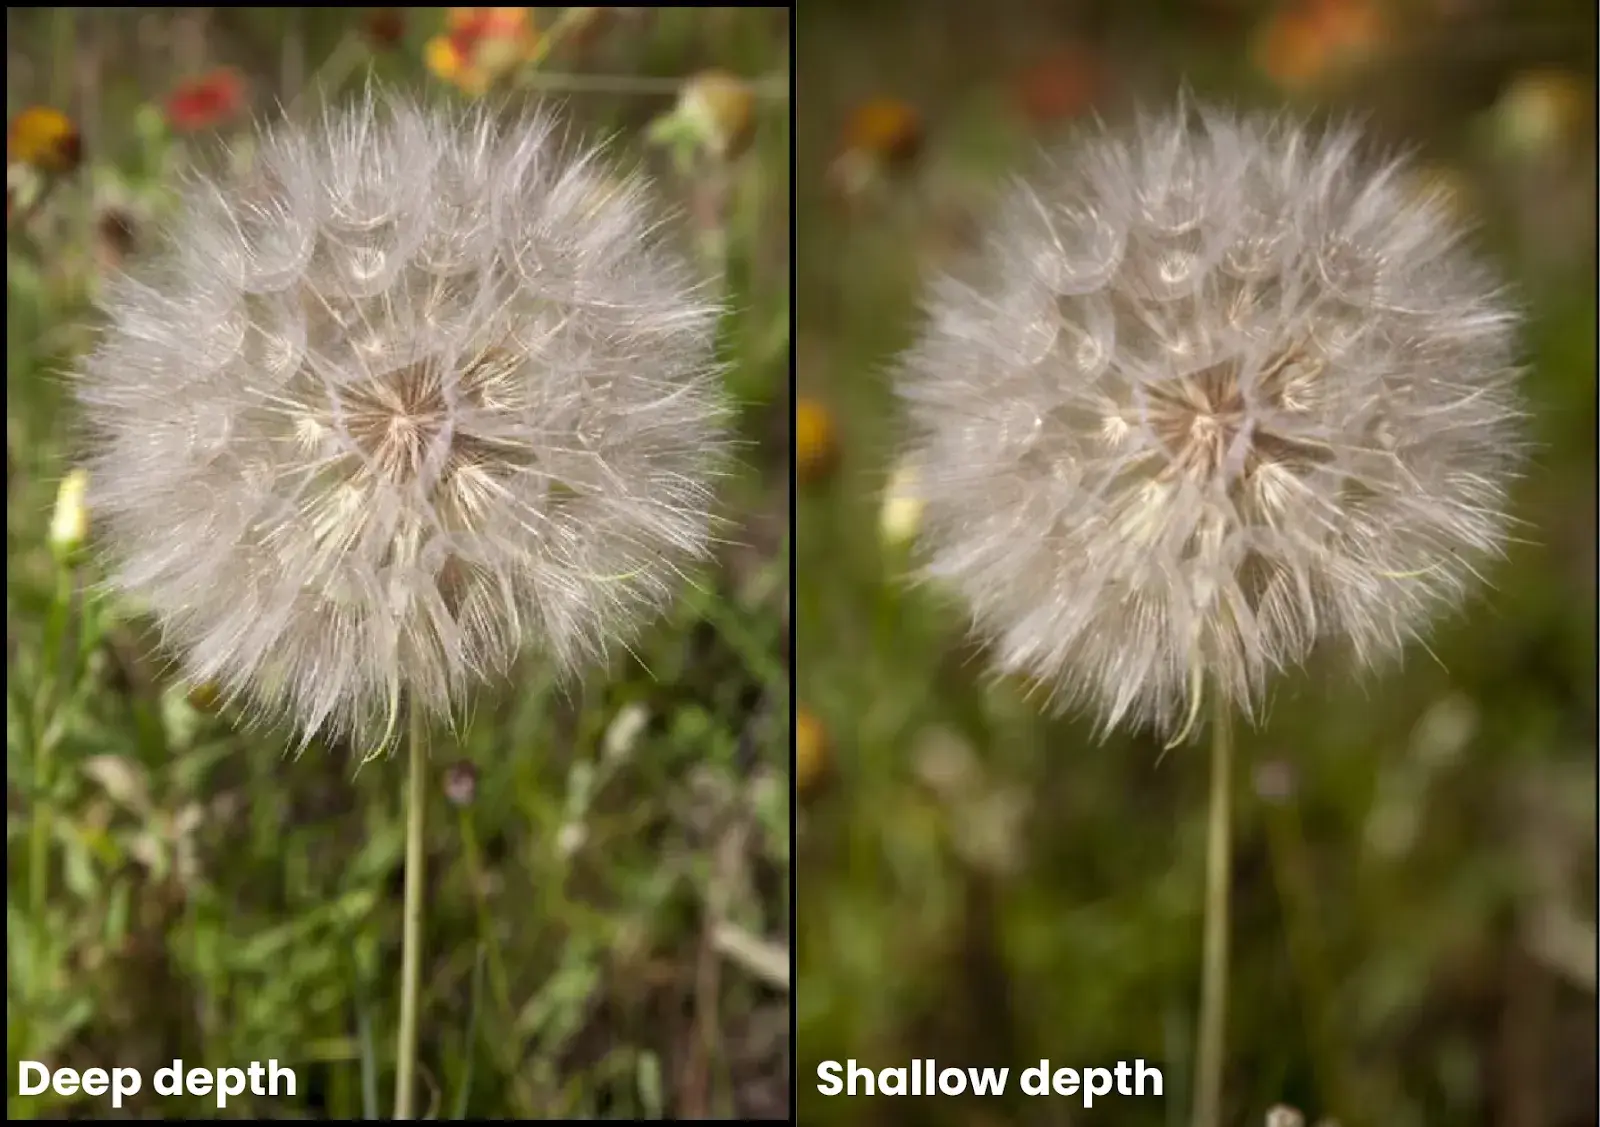
The choice
The choice between shallow and deep depth of field for B-roll largely depends on your creative intent and the subject matter. Shallow depth of field excels in situations where you want to create emotional impact or direct viewer attention to specific details.
Deep depth of field, on the other hand, proves invaluable when context and clarity are paramount. It is the preferred choice for establishing shots, architectural footage, and technical demonstrations where viewers need to see multiple elements clearly.
Above all, it is important to ensure that your choice serves the story you are trying to tell rather than simply following trends or personal preferences.
5. Camera Settings
Frame Rate
Frame rate (FPS - Frames Per Second) is the number of individual images (frames) your camera captures and plays back each second to create the illusion of motion.
Higher FPS = More images per second = Smoother motion
Lower FPS = Fewer images per second = More traditional/cinematic look
The human eye typically perceives smooth motion at around 24 frames per second, which is why this became a standard in filmmaking.
While shooting B-roll you have to choose different frame rates according to their use case. For example:
1. 24 FPS
It creates a classic "film look" and provides natural motion blur. It is best for shooting B-roll for Feature films, Documentaries, Narrative content, Music videos, Dramatic B-roll sequences, and Interview-based content.
2. 30 FPS
It creates a more realistic and less stylized look and strikes a good balance between smoothness and file size. It is best for shooting B-roll for Corporate videos, News broadcasts, Live streaming, Social media content, YouTube videos, and Real estate tours.

3. 60 FPS
It creates ultra-smooth motion, which is perfect for fast action. It is ideal for scenes requiring precise motion.
4. 120 FPS and Higher
It creates dramatic, super-slow motion, allows for extensive motion analysis, and creates impressive visual effects.
Shutter Speed
Shutter speed refers to how long your camera's sensor is exposed to light. In the video, it is measured in fractions of a second. The shutter speed directly affects two key aspects of your video:
First, how much light enters your camera as a longer shutter speed (like 1/30) lets in more light, making your image brighter, while a faster shutter speed (like 1/200) lets in less light, making your image darker.
Second, how movement appears in your video as a slower shutter speed creates more motion blur (making moving objects look smooth but slightly blurry), while a faster shutter speed freezes motion (making moving objects look sharp but potentially choppy).
Your shutter speed should typically be double your frame rate. For example, if you're shooting at 24 frames per second, your shutter speed should be 1/48 or 1/50 second. This creates a natural-looking amount of motion blur that viewers are accustomed to seeing in professional video.
This rule helps your B-roll (supplementary footage) blend well with your A-roll (main footage) because it will have a consistent, professional look.
Resolution and Codec
Shoot in the highest quality your camera and workflow can handle.
Recording in 4K
Consider recording in 4K, as It gives you the flexibility to crop and reframe shots while maintaining HD quality in your final output.
This is especially useful when you want to create multiple angles or frame variations from a single B-roll shot. You can add simulated camera movements like pans and zooms in post-production while maintaining sharpness.
The additional resolution helps capture fine details in environmental or product shots that are common in B-roll
codec selection
A codec is a format or method used to encode and compress video when it's recorded. Some codecs preserve more visual information than others. For better results, opt for high-bitrate codecs.
Bitrate refers to how much data is stored per second of video. Higher bitrates mean more information is preserved, which results in better quality but larger file sizes.
For instance, if you want 4K footage, aim for a minimum bitrate of 100Mbps. This higher data rate captures the nuanced textures and movements that are hallmarks of quality B-roll sequences—whether it's the gentle ripple of water or the textural details of a product surface.
Recording in Log profiles is highly recommended for B-roll if your camera supports it. Log (or logarithmic) profiles are special color settings that capture a wider range of brightness levels and colors, preserving more details in shadows and highlights. They look flat and desaturated initially but allow you to adjust the footage later.
The reason these technical choices matter is that B-roll (supplementary footage) often needs to be adjusted to match different A-roll (main footage) clips. Having higher-quality original footage with more data gives you more flexibility when color grading (adjusting colors) to make all your footage look consistent.
A-roll and B-roll consistency
To maintain consistency, always record both using the same frame rate to avoid motion differences. If your A-roll is at 24fps but your B-roll is at 60fps, the motion will look different when you cut between them. One will appear smoother than the other, creating a jarring visual disconnect for viewers.
Try to match color profiles between cameras if using multiple bodies. Different cameras capture colors differently. If you're using multiple cameras (like a main camera for interviews and another for B-roll), you should set them to use the same color profile so the footage looks consistent when edited together.
Use the same resolution and codec settings across all cameras to ensure uniform quality and post-production flexibility.
Keep ISO settings within a similar range to maintain consistent noise patterns. ISO controls how sensitive your camera is to light. Higher ISO settings make the camera more sensitive to light but introduce more visual noise (graininess). If your A-roll is shot at ISO 800 but your B-roll is at ISO 3200, the B-roll will look noticeably grainier, which can be distracting.
Production Considerations
1. Length of clip
When shooting B-roll, capture longer clips than you think you'll need—aim for at least 10-15 seconds per shot.
This provides editing flexibility and ensures adequate coverage for any sequence length requirements.
2. Camera Movement Duration
When you're shooting B-roll that involves camera movement (like a pan, tilt, or slider shot), you should structure each shot into three distinct parts:
First, start with a "static hold"—keep the camera completely still for 3-5 seconds at the beginning of your shot before you start moving it.
Second, execute your camera movement—move the camera smoothly through the scene to capture your intended motion.
Third, end with another "static hold"—once you've completed the movement, hold the camera still again for another 3-5 seconds.
This technique provides clean entry and exit points for your edits while ensuring smooth transitions between shots. Quality B-roll often comes down to patience and attention to detail. Take your time in setting up shots. This will ensure that your movements are smooth and deliberate.
These extra efforts during production will pay dividends in post-production flexibility and overall video quality.
Post-production
1. Organizing your B-roll library
Before diving into editing, establish a systematic approach to organizing your B-roll footage.
Create a dedicated folder structure categorized by location, subject matter, or shooting date. Use descriptive file naming conventions that allow quick identification of content.
If you're struggling to find and organize your B-roll, FinalLayer has got you covered. Simply type what you need and instantly find exact clips to use as B-roll or to post on social media. Adjust using timeline or transcript, save to theme-based bins, and access your library anywhere. Save countless hours with searchable B-roll footage that works when and where you do.
2. Color Grading B-roll
Effective color grading creates visual cohesion between your A-roll and B-roll footage.
Begin by matching your B-roll's exposure and white balance to your primary footage. Then, apply a base grade that establishes your project's overall look.
For B-roll shots in LOG profiles, first, apply the appropriate LUT (Look-Up Table) to convert to a standard color space before making finer adjustments. Remember that B-roll often requires more aggressive grading than A-roll to create visual harmony, particularly when footage comes from different cameras or lighting conditions.
Pay special attention to skin tones when grading B-roll that features people, as viewers are highly sensitive to unnatural skin colors. Maintaining consistent color across all footage creates a professional, cohesive viewing experience.
3. Timing and Pacing
The rhythm of your B-roll integration significantly impacts viewer engagement. Avoid rapid-fire B-roll sequences that can overwhelm viewers; instead, allow each shot adequate time to register—typically 2-4 seconds per static shot and 4-8 seconds for moving shots.
When cutting between multiple B-roll clips, establish a consistent visual flow by matching movement direction or compositional elements between shots. For interview-heavy content, time your B-roll cuts to complement natural pauses in speech or emphasize key points.
Remember that strategic moments of restraint—returning to A-roll at crucial moments—can create more impact than continuous B-roll coverage.
4. Sound Design for B-roll
While B-roll is primarily visual, its sound elements significantly enhance immersion. Consider whether to use the natural sound (nat sound) captured with your B-roll or replace it entirely with music or voice-over.
For documentary and reality formats, mixing in location audio at reduced levels (around 10-20% of normal volume) creates a subtle environmental context that deepens viewer connection. When transitioning between multiple B-roll clips, use subtle audio to avoid abrupt sound changes.
For B-roll sequences without dialogue, consider adding subtle sound effects that emphasize on-screen actions—footsteps on the pavement, the rustle of leaves, or ambient city noise—to create a more immersive viewing experience.
5. Finalizing Your Edit
Before finalizing your project, review your B-roll usage with fresh eyes, preferably after stepping away from the edit for at least a day. Ask yourself whether each B-roll clip genuinely enhances the story or if it merely fills time.
Pay particular attention to transitions between A-roll and B-roll, ensuring they feel purposeful rather than arbitrary. Professional editors often fine-tune these transitions down to the exact frame to create visual flow.
Finally, export a draft version and watch it on a different device than your editing monitor—preferably on platforms similar to where your audience will view it—to ensure your B-roll appears as intended across different viewing conditions.
Common pitfalls and solutions
1. Avoiding overuse
Like any powerful tool, B-roll can be overused. The primary purpose of B-roll is to enhance your story, not overshadow it.
Be selective in your implementation, using B-roll when it truly adds value rather than simply because it is available.
2. Maintaining narrative focus
Illustrative footage makes the visual more appealing but shouldn’t take away from the verbal message. Each attribute of B-roll must have a defined role in your narrative and may focus on setting the scene, illustrating a fact or theme, or offering a powerful emotional appeal.
One question you should ask yourself is whether the B-roll footage enhances your story or whether it is tangential.
3. Final polish and review
The final stage of B-roll implementation involves stepping back and viewing your work with fresh eyes.
Try to watch your edit from a viewer’s perspective. Paying attention to how the B-roll affects the overall flow and impact of your story. Look for opportunities where you can refine transitions with the help of B-roll. You can adjust timing or even remove B-roll that does not serve your narrative goals.
What next?
The steady evolution of video production has established B-roll as an indispensable element in storytelling. The ability of B-roll to solve technical challenges, enhance narrative depth, and create emotional connections makes it a fundamental skill for any content creator. Mastering B-roll techniques helps deliver high-quality, engaging content that resonates with audiences across all platforms. Armed with these strategies and best practices, videographers can confidently craft compelling visual stories that meet today's professional standards.


